

![]()
As I commented in previous posts, the way photographic paper reacted to traditional colouring techniques depended on the amount of chemicals remaining after processing.
Thus light areas took slightly different colours from mid tones and dark ones.
In GIMP, we can mimick this behaviour by adjusting curves per each RGB channel separately. This way, each lighting zone will have a slight difference in colour balance.
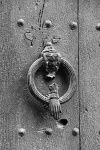
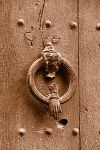
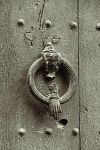
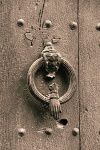

Above: Original, Sepia, Platinum, Paladium, Cyanotype -
five different versions of a same image...
In internet, you will find multiple table proposals for the different traditional processing techniques. As a proposal, please check the following table:
| Red Channel | Green Channel | Blue channel | |
| Paladium | 63/67 127/143 191/213 | 63/62 127/121 191/191 | 63/47 127/103 191/170 |
| Platinum | 63/74 127/127 191/191 | 63/63 127/127 191/191 | 63/50 127/112 191/175 |
| Selenium | 63/77 127/140 191/197 | 63/60 127/125 191/190 | 63/61 127/129 191/195 |
| Silver | 63/59 127/119 191/187 | 63/67 127/131 191/191 | 63/67 127/129 191/191 |
| Silver gelatine | 63/79 127/149 193/213 | 63/59 127/123 191/188 | 63/33 127/93 191/156 |
| Sepia | 63/100 127/165 191/214 | 63/55 127/115 191/187 | 63/20 127/83 193/172 |
| Cyanotype | 127/24 191/117 | 127/137 191/203 | 127/220 191/250 |
The difference in the tables that you may find in Internet is really small - maybe five points at some value.
Selection of the specific channel
When opening the auxiliary curves window (Colours -> Curves), you will see a drop-down menu (1), where you can pick Red, Green or Blue channel.
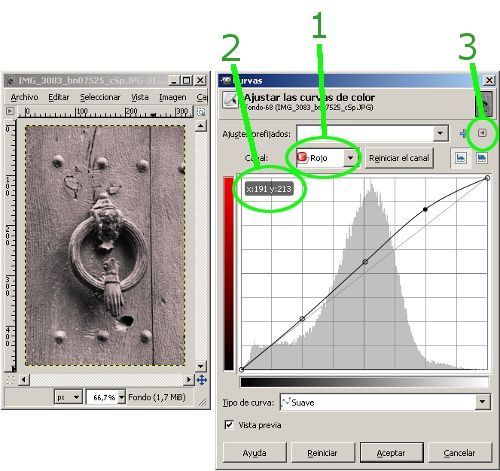
How to read the above table...
In each cell you will find two or three pairs of values. Those refer to input and output values, respectively.
On the curve, we can create a point just by clicking over it, then dragging the mouse until you get to the desired values (2)
For a given setting, you need to introduce all needed values for all three channels.
Save it...
Luckily, GIMP includes the option of exporting the fixed settings, giving them a name ("sepia...") to recall them in a later pic edition - same photo, or a different one.
Save option is in another drop-down menu, in this case from a small triangle on top-right of the auxiliary window (3).
You must save the setting before applying it with the "Apply" button.
Still more?
The above described method applies for a generic black and white picture (in RGB-grayscale, all three RGB channels with same information) to reach the desired tint result.
But, what if the original picture is not black and white? Try to apply those curves to (for example) your portraits - you might find interesting output effects!
You might also like...
- Traditional B&W colouring with GIMP
- B&W photos colouring with "multiply" in GIMP
- Vignetting with GIMP
- Further GIMP posts...
________________________
Are you interested in curves and levels? In that case, don't miss my book "Levels and Curves with GIMP"
