

![]()
A simple visual trick to improve the presentation of your photographies is to add a frame to them.
In GIMP, you can do this very easily with the canvas resizing option. This post will show you how.
Some calculations...
For example, I asume you will want to print your pictures. In this case, at a typical 300ppp resolution, each pixel will measure 25.4/300 = 0,08mm. So you need about 12 pixels to produce a line of one millimeter wide.
Then, let's say you want to have a frame of 5mm around your picture - this will be 60 pixels at each side. The canvas will need an overall size increase of 120px.
Alternatively, you may think in percentages (for example, a 5% of your image dimensions), or directly in pixels, if you intend to publish in a web page.
Canvas resizing
Open your picture. You will see its dimensions in the name bar on top. If you are not sure which dimensions to choose, take a percentage. Use 5% of longer side to begin with. In a 800 x 600 image, this would be 40 pixels. We will increase the dimensions by double that number.
Select the command "Image - Canvas size...". You will see an auxiliary window for the adjustments.
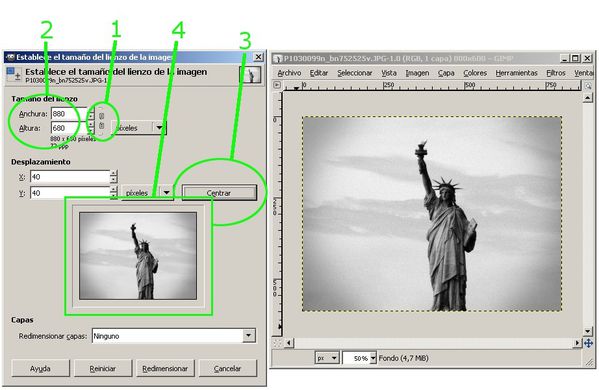
First thing you have to do is to unset the "chain" icon (1), so that you will define dimensions independently - aspect ratio will change slightly.
Then, input the new dimensions - in my case, 880 x 680 pixels (2).
In order to have a centred frame, click on "Center" button (3). You will see the preliminary result in the image miniature (4). If you like the result, click on the "Resize" button.
Fixing the image size
You will probably see the new canvas as a checkered background around your original image. What you need to do is to extend your image up to the canvas borders, and fill those with content.
In GIMP, this is done with the "flatten" command, that you can find by clicking with the right button over the miniature in the layers window.
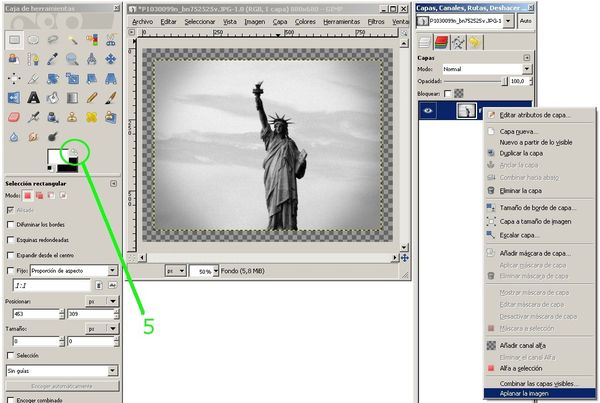
Make sure you swapped the colors (5) to fill the frame with black colour. If you whish a white frame, you do not need to do this. If you want any other color, bear in mind that "flatten" command will fill the border with whatever color you have as background setting.
Review...
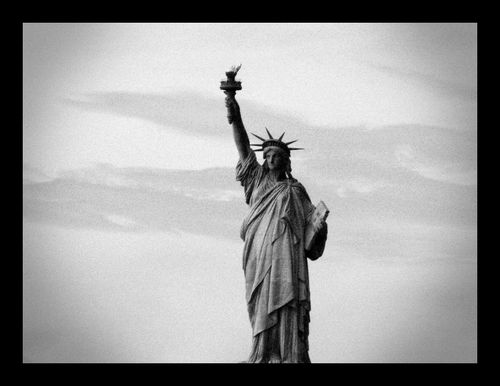
You will now have your framed image. You could decide if the frame is OK, maybe too thick or too this for your expectations. So you may restart the process again...
And remember to save the file under a different name (maybe an "f" suffix?) to keep the original picture unchanged.
You might also like...